10/12/2009

Something intresting in Windows 7 and windows 2008 R2


Tried to setup HYPER-V role in my desktop PC after installing Windows 2008 R2 (It's a new rig :) )
Tried to install windows 2008 R2 Ent and Windows 7 as guest OS in my HYPER-V environment. After installing went on usual method of installing the IC's (integration services), but no need to do that anymore. According to the given message ic's has been installed already.

Wondering if this installed automatically during the setup I went to the control panel and found no evidence for that. So looks like Microsoft has integrated the ic's into the OS itself!

Looks like MS expecting big change in future on visualization an they have been ready for it with the launch of Windows 2008 R2 and Windows 7.

8/10/2009

Windows 7 and upgrade options

Hope TechNet subscription people already enjoying the Windows 7 RTM (Build 7600) As a matter of fact I also rush into the new RTM version and choose Windows 7 Ultimate version :) One good thing I found is Windows Easy Transfer (aka Files and Settings Transfer Wizard in Windows XP) working smoothly as is. I had 20 GB data in my user profile and after the fresh installation of Windows 7 Easy Transfer managed to restore the data properly and even give nice indication what application I am missing and what application I’ve already configured. Pretty nifty I would say.

BTW due to lack of VGA card driver and trying to run several Graphic intensive applications first time I experience the Windows 7 BSOD woooot!!!! Now it's over with the latest NVIDIA VGA card driver installation.

Apart from that I found out this OS is stable and managed to handle whatever the apps I throw for it.

Now lots of threads talk about the complicated methods of upgrading path offered by Microsoft. While you go through that you’ll initially get the same feel but considering the new enhancements in the OS it would be acceptable for us to have the clean installation rather than upgrading. Luckily for the cooperate customers upgrade will be easy with the given tools by Microsoft Desktop team. More will come on that in another article. So sit tight and enjoy the new OS.

8/03/2009

Moving to MS Exchange from Lotus Domino

Hi everyone just wanted to share these information with you all since most of our customers are interested on the benefits on moving to Exchange from Domino mail environment to Exchange. Even though this will be a cost factor initially long term the ROI really going to help them to streamline the business productivity. We found most of our customers are having hard time maintaining Domino environment as well as support wise. Never the less my point is to provide some insight of the changing wave from Domino to Exchange happening is not only Asian countries but it's happening globally. Below you'll find a good article about the deciosn taken by major companies to move to new platform,

"In our last fiscal year (July 2008-June 2009), more than 4.7 million people began the switch to Exchange and SharePoint from Notes", Exchange marketing director Julia White posts on the Unified Communications blog.
Cost savings is the number one driver for migrations, according to the post. Another key driver for migrations is the launch of Exchange Online and SharePoint Online. If you're considering the move to cloud-based services, Microsoft services offer plenty of choice for customers of all sizes. Julia notes that large Notes shops - including Coca-Cola Enterprises, GlaxoSmithKline, and Ingersoll Rand - are making the move from Notes to Exchange Online. Read more in Millions Switch To Exchange And SharePoint From Notes on the Unified Communications blog. (taken from http://msexchangeteam.com/)

http://blogs.technet.com/uc/archive/2009/07/23/notes.aspx

Microsoft has introduced the latest toolkit called freebusy connector to migrate Domino environment to Exchange. Recent toolkit even has the capability to migrate the Domino workflows to SharePoint as well. More information about the toolkit can be found here.

If anyone is interested on this you can PM me offline. I can provide more information since our company already carry out testing on this and found out the connector is working properly. What we are up to now is testing this on Exchange 2010environment :)

7/30/2009

Windows 2008 Components Posters

Ever wonder it would be easy if you can know all the Windows 2008 features in one sheet so at a glance you can look at it and get the big picture. Well that wait is over for me since I found out Microsoft has a solution for this, giant poster!

Previously published in the TechNet Magazine, these are two PDFs of Windows 2008: Operating System components and Active Directory components. The posters explain how they work and detail capabilities. They are great resources to have up on your office wall.

The Feature Components poster highlights the following components of the Windows Server 2008 operating system:

Terminal Services
Network Access Protection
IIS 7.0
Server Manager
Server Backup
Server Core
BitLocker
Windows Server Virtualization

The Active Directory Poster highlights the following components of Active Directory in Win2008

AD Lightweight Directory Services
AD Federation Services
AD Rights Management Services
Group Policy
AD Management
AD Read-Only Domain Controllers

Many thanks go to MS team who has been taking considerable time to prepare these posters. You can get them by visiting over here.

7/19/2009

Windows 7 keyboard shortcuts

Widows 7 is in the horizon. Most of us enjoy the beta version and still using widnows RC :) So why don't you go the extra mile and try out the short cut keys as well. Below are some of the short cut kes I found out while browisng the web sites,

Win + UP Arrow Maximize the current window
Win + Down Arrow Restore down or minimize current windows
Win + Left Arrow Dock the current window to the left half of the screen
Win + Right Arrrow Dock the current window to the right half of the screen
Win + [number] Activate and run the program pinned on Windows 7 Taskbar, running program won̢۪t be affected
Win + Home Minimize all but the current window
Win + Space Makes all windows transparent so you can see through to the desktop
Win + Pause/Break Open System Properties
Win + Tab Flip Aero 3D [press Tab to cycle between Windows]
Win + B Move focus to notification tray (the right-most portion of the taskbar)
Win + D Show/Hide desktop
Win + E Windows Explorer is launched
Win + F Search
Win + G Bring all gadgets on top and foreground
Win + L Lock Computer
Win + M Minimize all windows
Win + P Open the projection menu (generally used for laptops connected to projectors)
Win + R Run Command is launched.
Win + S OneNote Screen Clipping Tool
Win + T Show preview thumbnail of running applications in Windows Taskbar one by one without mouse over
Win + X Mobility Center
Win + # Quicklaunch
Win + = Magnifier
Win + [+/-] Enables the magnifier and zooms in/out
Win + Shift + Up Arrow Maximize vertical size
Win + Shift + Down Arrow Restore vertical size
Win + Shift + Left Arrow Jump to left monitor
Win + Shift + Right Arrow Jump to right monitor
Win + Shift + M Undo all window minimization
Win + Shift + T Cycles backwards
Win + Ctrl + F Opens the Active Directory Find Computers dialog
Ctrl + Right Arrow Move the cursor to the beginning of the next word
Ctrl + Left Arrow Move the cursor to the beginning of the previous word
Ctrl + Up Arrow Move the cursor to the beginning of the previous paragraph
Ctrl + Down Arrow Move the cursor to the beginning of the next paragraph
Ctrl + Click A pinned taskbar icon to cycle through the program̢۪s open windows (e.g. IE)
Ctrl + Win + Tab Persistent flip 3D
Ctrl + Shift with an arrow key Select a block of text
Ctrl with any arrow key + Spacebar Select multiple individual items in a window or on the desktop
Ctrl + Shift + Esc Open Task Manager directly
Ctrl + Shift + N Create new folder

7/16/2009

How to asses an existing infrastructure with Microsoft tools

Most of us visit customer sites to identify their existing infrastructure to help them better. In this process indentifying their network and finding troubles and doing recommendation will be vary according to each persons experience level and knowledge on product.

We use various tools for that and some will rely on third party tools as well. So depend on the information they gather the solutions you provide for the customer will be vary.

As Microsoft point of view they always want to empower the partners and as well as the customers and let them use the Microsoft software efficiently. So this thread is all about one of the Microsoft key success tool known as MAP (Microsoft Assessment and Planning) sometimes this will be referred as MAPS as well.

The whole idea behind MAP is to give the partners and customers is to do basement of their existing network / infrastructure and identify the hardware software and decide if they are ready for the new software /technologies. This will give you a clear picture and help you to make correct decisions. Based on my experience this will be a key tool any filed engineer should have in his belt of tools to better serve the customer.

Think about a scenario when you go and recommend Microsoft products do you really know their environment before you do that suggestions? Do you really know their business process? Now days it’s all about how you try to map your solution with their business process. So this tool will empower you with that information and give the clear visibility of their existing infrastructure. Armed with that information and your experience the solution you offer for the customer will be effective one.

More information will be provided by Microsoft if you visit over here.

7/12/2009

Active Directory monitoring and health checkup

As system administrators most of us spend time on end user problem troubleshooting and forget to oversee the Active Directory services. We only concern about the AD server when we’re getting problems and then we see all sort of problems related to DNS, replications…etc. This guide is focus on providing proactive monitoring of the Active Directory so as system administrators you will have better understanding of your infrastructure.

Is it best recommended to do the following test once a month and keep the log files for trend analysis as well. To make thing easier I’ve provided the necessary urls of individual commands pointing to the TechNet so you can get more compressive details,

Dcdiag.exe /v >> c:\temp\pre_dcdiag.txt
This is a must and will always tell you if there is trouble with your DCs and/or services associated with it

Netdiag.exe /v >> c:\temp\pre_Netdiag.txt

This will let us know if there are issues with the networking components on the DC. This along with the post test also is a quick easy way to ensure the patches installed is really installed (just check the top of the log)


Repadmin /showreps >> c:\temp\pre_rep_partners.txt

This shows all the replication and if it was successful or not. Just be aware that Global Catalogs will have more info here than a normal domain controller.

repadmin /replsum /errorsonly >> c:\temp\pre_repadmin_err.txt

This is the one that always takes forever but will let you know who you are having issues replicating with.

Apart from that Microsoft offers another tool called MPSRPT_DirSvc.exe. You can run this tool in the dc’s and it’ll run most of the above mention commands and provide you the output into log files. Very handy I would say. You can download it from here.

Hopefully this helps you when you troubleshoot your domain controllers but by no way is this all encompassing list of things to do. These are the standard steps normally I take but I would love to hear what you all do as well.

4/20/2009

Another server OS into the SBS market by Microsoft

Microsoft release another server OS aim for SBS market name as “Windows server 2008 Foundation” Microsoft main aim is to promote this as the first server for a small network. Users who are unable to invest on SBS server and doesn’t have requirement for in-house exchange server will be benefit of this product. Currently Microsoft don’t have any plans for selling this as a box products instead coming through Original Equipment Manufacturers (OEMs) only.

Feature comparison can be found over here.

2/25/2009

‘Fix it” New approach to fix computer problems by Microsoft

fixitRecently I notice a new icon appears in the Microsoft Support documentation. So what is interesting behind this fix it icon. Well let’s say that you know the problem what customer is facing and you’re pretty sure you can fix it in no time. Let’s say in order to fix that particular problem you have to do few mouse click and do some registry editing. Now doing this for one or 2 machine would be ok but for 30-40 computers or even more!!! well not a pleasant experience right ?

So what Microsoft has don’t is created a nifty script behind this icon and all you have to do is click it. I think this is very useful for most of the non technical as technical people. If Microsoft adopt this for their Support documentation frequently end users will definitely gonna enjoy that. You can find a sample link to one of those Microsoft support document here.

2/17/2009

How to sysprep Windows 2008

I spend most of my time with virtual PC’s creating recreating for testing. one thing I hate is to create new virtual PC’s for testing. Instead of that I prefer to use a clean installed OS cloned. Now this has been working fine for me in Windows XP, Windows 2000/2003. I just do a cloning under VMware and then run the Newsid utility and then join to the domain. There you go easy as that. But now with windows 2008 Sysinternals haven’t given any tools ( I mean properly working newsid) So we have to rely on Syspep method.

In windows 2000/2003 time you will have to find these utilities in the media. Now with the new kid it’s already in the pocket. You just got to %WINDIR%\System32\Sysprep and then run the sysprep.exe
If you want to create a new SID, remember to CHECK the “Generalize” checkbox - or else you have to go all over again…

image

That’s it. Happy cloning guys/gals.

2/16/2009

Windows 7 – Problem Step Recorder (PSR)

I have been using Windows 7 in a VMware PC and I’ve to agree this OS is really cool. I have only given 1 GB memory for that and the functionality wise this stable. I didn’t encounter any system crashes so far. Now looking around in the TechNet about further enhancement about this product I found a nifty tool integrated in Windows 7 called as PSR (Problem Step Recorder)

Basic idea behind this tool is allow user to do screen capturing of the problem they encounter and then send that to a technical person. Now this is a life saving feature for any technical person in order to provide support for a en user. Think about a helpdesk environment where end user and technical person spend endless time discussing about the error message. There are few key things helpdesk may fail to solve the problem properly to the end user,

1. End user cannot describe the problem properly since he is not very technical person.

2. Technical support person cannot recreate the problem in his side according to the information he is getting from the end user.

3. Problem can be a totally new one for both parties.

So using this screen capture tool end user will be able the capture the error he encountered and then send to technical person via e-mail or any other preferred method.

More information can be found over here.

2/01/2009

Windows 2008 / windows Vista SP2 (beta) overlook

Beta is out there to download for everyone. TechNet and MSDN subscribers can download the SP2 CPP now from their portal. Now good news is windows 2008 service Pack 2 can be applied to Vista computers as well. The secret behind is that both operating systems use the same codes. This brings a huge advantages to administrators when they want to deploy the service pack to the computers in their organizations. So what are the new advantages on this service pack? Well in the server side few things are as follows,

  • Improved power savings over the RTM release of Windows Server 2008
  • Integration of Hyper-V into Windows Server 2008.  SP2 includes the Hyper-V RTM Code.
  • All previously released hot fixes and security updates are rolled into SP2 as well.

As per the client pc side,

  • A new Wireless Feature Pack and fixes for issues where Wi-Fi Connections were lost after resuming a PC from Sleep.
  • A really cool service pack clean-up tool that restores hard disk space by deleting the previous versions of the files serviced by Windows Vista SP2.
  • Of course this service pack includes all previously released updates, hot fixes, and patches since the release of Vista Service Pack 1.
  • Let you record data onto Blu-ray discs
  • Give you the latest desktop search engine, Windows Search 4
  • end users are advised to await until the final version out. More information can be found here.

    1/30/2009

    MSN messenger latest version

    With the introduction of the windows VISTA/ Windows 2008 SP2 beta , Windows 7 Microsoft also has released the next version of MSN messenger. You can grab it from here,

    One cool thing I notice is you can have animated pictures or video clips you have captured from your web cam as MSN picture. This is really cool.

    1/29/2009

    How to enable hibernation option in windows VISTA

    If you have notice some PC /Laptop hibernation option is not visible under the power management. I was curious to find out same problem occurring in my laptop as well. Further search revealed it’s a matter of enable or disable it via running few commands from the command prompt :) But again windows annoying UAC come into the picture so we need make sure we run the commands under proper privilege. The steps are as follows,

    1. Click Start, All Programs, and then right click on "Command Prompt".
    2. From the context menu click on "Run as administrator".
    3. If User Account Control prompts you to allow the action, click on Continue.
    4. In the command prompt window, type "powercfg –h off" (or "on" without the quotes) followed by Enter button.
    4. Close the Command Prompt windows and go the power management settings in the control panel Now you can see hibernation option is available for you.

    1/25/2009

    Windows Server 2008 - Fine Grained Password Policy Walkthrough

    Windows 2008 has lot of new technologies to offer and along with SP2 it has been increased. Branch office caching, Active Directory recycle bin..etc. Among those one of the cool feature is Fine grained password policy. Using this method you can given different set of password polices to selected users or group despite of the default password policy.

    This may sound good if you have wish to have different password policy to managers and different password polices to general users and avoid the hassle you face when they forget their complex password. (you know what I mean..right :) Of course you might have been using the password filter or deploy multiple domains to archive this but end of the day those are really frustrating and time consuming methods.

    so now you had the taste of the feature let's get our sleeves up for the work :) To make things easier I am going to built this article based on a scenario based method.

    Contoso.com is the default domain of the fictitious company and Neo parker has been the CEO. He don't like the idea of having a complex password to remember and prefers to have a simple password as his account password. So without breaking the security on the entire domain level you're going to reduce the password complexity and the minimum of 5 characters to his passwords.

    4

    Requirements: your AD domain functional level has to be raised to windows 2008.

    First have a look into your existing domain-wide default password policies,

    1. Start --> Run --> gpmc.msc
    2. Expand Forest: yourforest.com.
    3. Expand Domains\yourdomain.com.
    4. Right Click Default Domain Policy and Click Edit.
    5. Computer Configuration > Windows Settings > Security Settings > Account Policies > Password Policy.
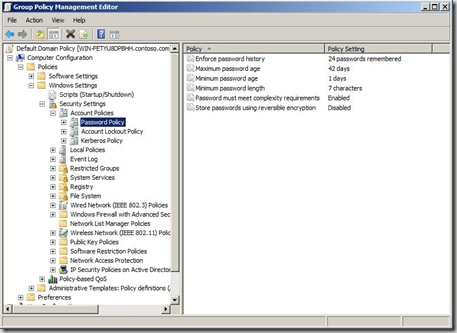
    1

    So now we need to create the Password Setting object (PSO). in order to do that we need to open the ADSI edit. I have to warn ADSI edit is not a place to mess around with unless you know exactly what you're doing!

    Go to Start--> Administrative tools --> ADSI edit --> select the default settings to connect to the domain. After that in order to create the PSO browse to Expand to Default Naming content\DC=Contoso,DC=com\CN=System\CN=Password Settings Container\

    Right click and select new Object,
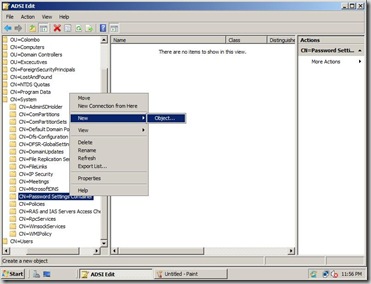
    3

    After that you have to select msDS-PasswordSettings and click next

    5

    After that we are coming to complex part of giving the parameters, this is the place you have to pay attention and provide the correct parameters. For detail step by step you can visit here

    First setting being ask is to provide a name for the policy, you can give an fancy name but stick to a one that is meaningful,

    6

    Next setting is msDS\PasswordsSettingsPrecedence. Assuming the user is a member of 2 or more groups and having different password polices the number you set here will determine which policy to take procedure. So set the value to 1 to make sure this policy will apply all the time to Neo

    test

    Next one is msDS-PasswordReversibleEncryptionEnabled which is self explanatory

    8

    Next few option are really self explanatory so I'll insert the parameter and the value until we come up with another interesting value :)

    msDS-PasswordHistoryLength (Also self explanatory... you can keep up to 1024)
    Value = 10

    (domain default: 24)

    · msDS-PasswordComplexityEnabled (Upper, lower, number, blah blah blah)
    Value = True

    · msDS-MinimumPasswordLength (If only everyone were using pass-phrases instead of passwords)

    Value = 5

    After that we are being request to provide values for MinimumPasswordAge, MaximumPasswordAge, LockoutObservationWindow, and LockoutDuration.

    So let us walk through the first one of this kind, msDS-MinimumPasswordAge

    12

    In the above picture I have provided the value of 1 day. First section is days, then hours, minutes and seconds. Next is

    msDS-MaximumPasswordAge
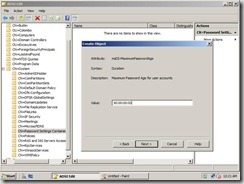
    13

    I hope rest process will be easy for you as we discuss here. so instead of the screenshots let me provide the values as follows,

    msDS-LockoutThreshold

    Value = 0

    msDS-LockoutObservationWindow

    Value =00:00:06:00

    msDS-LockoutDuration

    Value = 00:00:06:00

    Once you complete the last step you will click the Finish button to complete the steps. If you encounter any errors please have a look into the values you have provided.

    15

    so now we have provided Neo minimum characters 5 to his password and still enabled the Password complexity parameter and provide less time value for the Lockdown duration :)

    but still we are not completed because we have to tell the system this PSO need to be apply to Neo. If we double click the
    msDS-PSOAppliesTo parameter we have the option to provide the particular user's or Group's DN.
    20

    so now what how to find the DN value? well my friends we have to walk to the Active Directory Users and computers, and enabled the Advances Features,

    17

    After that we need to go to the properties of the Neo's account and select the Attribute Editor which shows the DN of Neo's user account.

    18

    Copy that value and we go back to the ADSI editor CN=System -->CN=Password Settings and under the current PSO paste the values you have copied from Neo's account,

    21

    Wola that complete the lengthy task.

    For more information you can refer here,

    1/16/2009

    SBS 2008 in the test run under my Lappie

    After doing some several testing in my desktop I thought of giving a try to run the Small Business Server 2008 in my laptop. Found our favorite virtulization method won't have a chance in my laptop since it only had 4 GB memory. SBS throw out a error saying memory is not enough when I allocated 2 GB for the VMWare vpc. (duh) So How came I came across the problem?

    Well of course allocating one logical partion to the OS and transferring 80 GB of data to another location (pretty tuff job  waiting for the data transfer complete) Once completed I end up doing the dual booting with my Vista OS.

    Installation ran smoothly and I didn't see much difference at all and took around 20 minutes for the first phase. SBS didn’t;t detect my wireless Lan card and I was not surprised about it at all. Managed to install the Lan driver separately and hope to run around with SBS in my bag. Too bad SBS really sloooow in my Laptop even it has been a Centrino 2 technology.

    Found out Lappies are not the best method unless if you have 7200RPM drives and 8 GB memory in your laptop. So SBS you'll be in my desktop for sometime. Look forward to do a live migration in few weeks time and hope to share my experience in that soon.

    1/14/2009

    Windows SBS 2008

    It's been a while I have been away from SBS world and into the windows 2008 OS. But after the announcement of the Small Business Server 2008 by Microsoft I did went for a digging. The information I found about the improvement for the product was amazing. First of all SBS server has received a new brother called as EBS (Essential Business Server) which has the capability to outcome the the 75 cals limitation and go up to 300 cals. Microsoft now have a clear segmentation of the Small Business market and the Mid size business market.

    12/13/2008

    Virtual machine addins for Server Core

    So you're eager to get your hands dirty on Microsoft latest OS, maybe you already have. As techies we always intend to be on virtual PC's to test the latest stuff and learn new settings and tweaks. Windows server 2008 has more to offer in this area. Windows core is pretty interesting method of using the windows server OS.

    One problem I came across with server Core is how to install the virtual machine addins to it. I'm using Microsoft virtual PC 2007 and after the initial OS setup I ran the virtual PC addins from the actions menu. Well it suppose to star the installation automatically right... well too bad it didn't happen. I hope you folks are well aware why we need the virtual addins to the virtual PC. Basically they are emulated drivers which enhance the response in the virtual machine and communication between the guest and the host PC.

    image

    So in order to install the addins you need to mount the cd / iso image to virtual PC. Under action menu when you click install the virtual PC addins it automatically mounts the iso image to the cd-rom in the virtual PC. To verify that you can click the CD icon in the menu and see if you have the option Release "VMaddtions.iso" So rest we carry out in the command prompt.

    image

    In my case the cd rom drive letter is D. If you have more than one virtual HDD installed then the drive letter can be different. Never the less you can browse the virtual CD and then get into the windows folder and then run the Setup.exe Once that start you'll able the see the GUI installation of the virtual machine addition setup.

    image

    In the above picture I have been prompted to remove the addins since I have already installed them earlier. But I hope you guys get the point.

    12/02/2008

    Network shares not accessible in Windows 2008

    I have recently installed Windows server 2008. After that upgraded it as a Domain controller. (more information will come in future about this) Since after that our internal users have
    experienced network /connection problems to the server.
    At least once a day I must reboot the server so that users can access the shared folders in the server. Since I host a database in this machine this problem has become a real headache and a panic to me.

    Users with offline files get notice that they are no longer connected to the server. They can't sync etc.
    When this happens you can still ping the server. Remote desktop to the server works 100% and the server seems to be working without any error.Tested the cabling and all the links passed the tests.

    So finally found out the problem relates to Symantec EndPoint protection anti virus software. I've been using ver 11 MR2. Further digging into this matter came up with the below mention article released by Symantec

    http://service1.symantec.com/support/ent-security.nsf/docid/2008061812370848?Open&seg=ent

    Apart from that Microsoft has acknowledged this problem can occur if you're having outdated NIC driver.

    After removing the AV software users back to business. I guess I'll have to test out the latest version of the Symantec (MR3) and then see if that solved the problem. Will update you all once I get my hands into SEP MR3 version.

    11/30/2008

    Installing Ubuntu 8.10 To A USB Flash Drive

    ONE of the features of Ubuntu 8.10 I have overlooked in my recent review was the utility included for creating a bootable version of Linux OS on a USB Flash memory stick.
    Personally I love the idea of having a whole operating system on a memory stick - it appeals to the geek in me and I love the look on a non-geek's face when you boot up their machine and your operating system comes up instead of theirs!
    But one of the issues I have frequently come across with such pocket-sized OSes is, how to make them persistent ie. getting any changes you make in the live environment to remain for your next boot.
    With the latest version of Ubuntu, however, everything you need is included in the GNOME menu - just look in System>Administration>Create a USB startup disk (this was also available in Ubuntu 8.04).
    The procedure to get Ubuntu installed, working and persistent is really very simple indeed.

    1. Download the Ubuntu 8.10 ISO and burn it to a CD
    2. Restart your computer, booting from the Live CD
    3. Insert a 1GB or larger USB flash drive
    4. Navigate to System>Administration>Create a USB startup disk
    5. Next, select the USB disk to use, select the option 'Stored in reserved extra space' and adjust the sider to set the capacity you wish to use (I set mine at 2GB on an 8GB stick), then click the 'Make Startup Disk' button. It is not a fast process, so go and make a coffee
    6. Once the installation is complete, simply remove the CD, restart your computer and set your boot menu or BIOS to boot from the USB device.

    This last step will vary according to how you BIOS is set up, but on my machine it was a case of holding down the F2 button during the boot process, then editing the Boot Devices section to make sure USB came first, followed by CD then HDD.
    And that, basically, is it. Thanks to Ubuntu's inclusion of the application Casper, any subsequent changes you make or data you create will be saved in the slice of the flash drive you created during step 5.
    So as you can see this feature will become very handy if you want to help someone to recover files in his/her computer when things go wrong.

    Windows XP and Vista also can be customized like this but not for the USB level but as bootable cd/DVD. BartPE is a good place to look into how to part.